Wednesday, June 30, 2010

Summer Fun Grab and Go Bag

I had seen and loved the idea of having a little tote stocked and ready to go at all times. So I picked up this simple tote at the Dollar Store. Its just perfect for a grab and go bag for just a dollar!!!

I wanted to decorate it in some way and was thinking I would try to put some iron on patches or something.....sooooo it sat in my closet for several weeks because I never think to buy patches lol.

So today when I was painting I thought I would try painting on it instead (since my 10 in 10 deadline is coming up quick lol). I was going to use stencils to paint "Summer Fun" but then I couldn't find my stencils. So I dug through my scrap stash and decided on this:

I put letter stickers on it:

Painted OVER the stickers:


I let it dry for 24 hours before I peeled the stickers:


I might add something more to it but for now my bag is stocked with travel wipes, hand sanitizer, mini suntan lotion, a towel, bathing suit for my son, and some small outdoor toys. I am all set for my play dates to the beach, park, whatever!

Linking Up With:
Get your craft on Thurs.


AND

Sunday, June 27, 2010

2 Down, 8 to go!

Here is my list and progress so far for the 10 in 10 challenge....I plan on working on a couple of these today though!!!

1.) Finish 4th of July hostess gift bag--Almost done

2.) Paint/decorate mini wooden bags--Started

3.) Clean out refridgerator--UGH why did I put this on my list!!!

4.) Make the vases for bathroom-DONE


5.) Organize shoe rack

6.) Organize pictures for picture wall

7.) Get cookie cutters together and find a place to store--Almost Done

8.) Bring bag to goodwill to donate-DONE

9.) Go through/clean/organize outdoor toys--What was I THINKING putting this one one here!!

10.) Make summer "grab n go" bag

Friday, June 25, 2010

Summer Fun Week 3

Sand Box (not as big of a hit as the rice box):


Bug Safari-I wish I could remember which blog I saw this on but it was the cutest idea! I drew little pictures of bugs and then we went on a walk to find each one:


Spoon Puppets (we had so much fun playing with these spoons, I was the mama spoon and he was the baby spoon lol) What an easy and fun project!:


Feed the Ducks (Actually just look at ducks because we weren't allowed to feed them lol):


Lowe's Build and Grow, SO fun! We built a monster truck:


Linking up to:

Summer Candle Display

I have this set of candle holders from Party Lite (that I've had forever) that are kind of like a three in one. You can use them as a vases, taper candle holder, or tealight holder. What I absolutely LOVE about them is that you can fill the inside (vase portion) with anything and put the tealight holders on top. I like to put things inside that go with the holiday (like Easter grass in April or fake spiders for Halloween lol). I've decided for the summer to use sand and shells. Sand is actually trickier to use then I thought! I like how it turned out but I may tweak it a bit, maybe figure out how to add some color!


Not only do I have a cute new display in my bathroom but I get to cross #4 off of my 10 in 10 List...YAY

Linking up with:


AND
http://mymagicmom.com/my-magic-friday/

AND

”DIY

Wednesday, June 23, 2010

10 in 10


I think I must be CRAZY to even *think* about doing this challenge from The Shabby Chic Cottage...10 tasks in 10 days??? Maybe I'm crazy or maybe I just need the motivation...so here goes nothing:

1.) Finish 4th of July hostess gift bag

2.) Paint/decorate mini wooden bags

3.) Clean out refridgerator

4.) Make the sand/shells vases for bathroom

5.) Organize shoe rack

6.) Organize pictures for picture wall

7.) Get cookie cutters together and find a place to store

8.) Bring bag to goodwill to donate

9.) Go through/clean/organize outdoor toys

10.) Make summer "grab n go" bag

Monday, June 21, 2010

4th of July Gift Bag

One of my BFF's has an awesome 4th of July party each year! I love to bring my hostess with the mostest a little gift of wine. This year I decided to make a gift bag instead of buying one. This project didn't really turn out the way I saw it in my head but o'well, its another thing to cross off my 10 in 10 list!
Started with one large blue bag and one large white bag. I ripped the blue bag in half:

My orginal idea was just punch stars in the blue bag, glue red paper behind where I punched, and glue the bags together. But it was WAY too plain!

So I found these super cute printable on Living Locurto's blog and added some stickles!

Then I added some firework stickles on the bottom :)


Linking up with:


Sunday, June 20, 2010

Summer Fun Week 2

Here is the second week of the fun things we did out of our summer fun container (first week here-http://inspiredcrafter.blogspot.com/2010/06/summer-fun-week-1.html):

Sponge Painting:


Rice Box (rice in a box=hours of fun, who would have thought lol):


Marble Painting:


Mentos/Dt. Pepsi Explosion (this was so cool, it happened SO fast that I couldn't get a picture of the actual explosion but it was really awesome!):


Garden Stone (kinda cheated when he "picked" this one but I needed to get this done for Fathers Day lol):


Linking to:

Happy Father's Day

My husband likes a good beer, so I went to a really cool beer store and had the beer connoisseur put together a six pack of beers that I thought my husband would enjoy:

Then I asked my son (age 4) what he loves about Daddy. I made little notes using what he said and mod podged them onto the back of the bottles:

Mod podged these letters to the top:

I used my sons hand print, stickers, and scrap paper to decorate the box:

He loves it!

Linking up to:
UndertheTableandDreaming

href="http://iheartnaptime.blogspot.com">giveawayssrc="http://i339.photobucket.com/albums/n454/jamielynnye/blog_Page_01-2.jpg"
height="125"/>

Sunday, June 13, 2010

Summer Fun Week 1

Here are some of the fun things we did this week from our Summer Fun Container-

Learn a Magic Trick:

Cookie Cutter Art:

Blowing Paint Art:

Water Bottle Foam Bubbles:

Make Chocolate Covered Fruit:


We had SO much fun with all of our projects so far!

Friday, June 11, 2010

Easy "Cars" Wall Decor

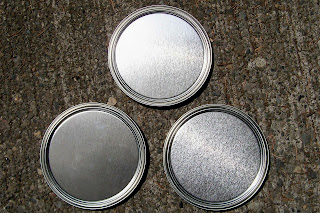
I wanted to use these paint can lids (leftovers from http://inspiredcrafter.blogspot.com/2010/05/paint-can-action-figure-organization.html):

I used two coats of black paint that I had laying around from a trim project (that I never finished lol). In hindsight, I should have used primer too but o'well:

Then I modge podged these foam "Cars" wall decor stickers (that I used to decorate my son's "Cars" themed room but he had picked them all off)...Anyhow I had them laying around and thought this would be an easy decoration I could use on his wall. It turned out pretty cute...plus its high enough on the wall that he CAN'T pick them off :)


Linking too:
UndertheTableandDreaming
Get your craft on Thurs.


AND

Life in my PJs

Wednesday, June 9, 2010

Organized Scrap-Inspiration Notebook

I have been scrapbooking for over 11 years now and I've built up quite the collection of....well...everything scrapbook related! One thing that I've noticed that is taking up WAY too much space is my scrapbook magazines! I look at them when I have scrappers block and need some inspiration. But I have way too many!


So I decided to look through e.v.e.r.y one of my lovely magazines and rip out the pages that inspire me! I am then organizing them into this notebook that will take up WAY less space! I made the "Inspiration" title on scrapblog and modge podged it to the front of a plain black three ring binder!
(Sorry for the glare, glue wasn't all the way dry!)


Linking Up To:

Organize and Decorate Everything

Sunday, June 6, 2010

Summer Fun Container

I have seen alot of really neat Summer bucket lists of fun activities to do all summer. I really wanted to make one too and I realize I am a little behind on this project! BUT my son isn't even in school yet AND here in the PNW its not really even summer yet, well weather wise! Anyhow I finally finished my summer fun container!

I put our fun "to dos" into three categories that are based on how much time each activity will take! Anything that can be done in a short amount of time is printed on white paper, activities that requires the whole day are printed on blue paper, and activities that require preparation are on yellow paper. I am very excited to start doing these activities with my son!

I have been holding onto this canister for a long time waiting to use it for something!


So I cleaned it up and modge podged some cute scrapbook paper to it. Then I added stickers, ink, and stickles to decorate it!


The back is not covered yet but I plan on covering with some pictures from doing the activities! So I will share that part at the end of summer when we have done all of our fun activities!

Linking up to:
BWS tips button

and

LinkWithin

Related Posts with Thumbnails